
Spring has sprung out on the Winchuck River on the
Wild River Coast of Southern Oregon.
"I've been
growing lettuce and other leafy greens in (galvanized steel) gutters for two
years now, and I've thought about using them for strawberries. A couple issues
to consider:
1) The ends
of the gutters can be hard to waterproof, since they are not designed to be;
the gutters are intended to slope away from the ends. I used tape (on the
inside surface) which has not held up well. If you use the gutters as intended
-- flowing toward a downspout -- rather than making them horizontal and
drilling drain holes as I did, you may have better luck.
2) The soil
in the gutters dries out very fast, even with full mulch. Plan on watering the
plants every day during dry weather.
3) One of
the chief advantages of planting in gutters is protection from rabbits and other
ground-based predators. If your strawberries' main predators are birds, they
may not be safe in hanging planters -- you may have to hang nets during berry
season.
Personally I
would not be concerned about either aluminum or steel leaching. Most PVC doesn't
hold up well to sunlight (UV) even if it's marketed for outdoor use, so it
fails from a durability standpoint regardless of its other properties.
+1 on them
drying out FAST. And at the same time, it is easy to flood them out if you
don't have a good drain system. You will need to water them a LOT--figuring out
a mini flood and drain or wick system just to water them is worth it, as it is
a PITA to water those top plants.
The other
problems are weight and installation. Guttering is not made to handle that much
weight and the bracketry doesn't always work with greenhouse framing very well.
My solution
to this was to suspend them with ropes wrapped around the front, bottom, and
back of the gutter every 5 feet (that is, 3 ropes for a 10-foot length of gutter).
I was able to support three gutters full of soil this way, one above another,
from three hooks on the garage eave. I was thinking that if I mounted them
against a wall next time, I would use boards supported at top and bottom (that
is, resting on the ground and attached to the eave above), and nail or screw
the gutter to the wall on back side and to the board on the front. Or
alternatively, screw horizontal supports between the wall and the vertical
boards, and just rest the gutters on these supports, with the wall and boards
preventing the gutters from splaying out with the weight of the soil."
Rain gutters
provide an ideal space for growing lettuce since they lettuce plants have
shallow root systems. You can mount gutters on the side of your house or shed,
along a deck railing or under a windowsill as a small planter. All you have to
do is cut the gutter to size, cap the ends and drill holes for drainage -- no
labor-intensive digging or tilling required
Things
You'll Need
Gutter, any
length you desire
2 gutter
caps
Drill
Instructions
1 Place the length of gutter on a work surface.
Slip one gutter cap on each end and ensure they lock into place.
2 Turn the gutter upside down on a work
surface. Drill 1/8-inch-diameter holes through the gutter every 6 inches along
the entire length. The holes will allow the gutters to drain. Use a drill and
1/8-inch bit.
3 Position gutter hangers along the surface
where you want to hang the gutter every 3 to 4 feet. Drive the included screws
through the mounting holes in the hangers into the surface with a screw gun to
fasten them in place. Slide the gutter into the hangers to lock it into place.
4 Add potting soil to the gutter and fill it
up so that it is level with the top edges of the gutter. Smooth over the top
with your hands.
5 Water the soil thoroughly with a watering can
filled with water. Make a 1/8-inch-deep furrow along the length of the gutter,
in the center, with a trowel. Plant lettuce seeds into the furrow, planting
approximately 60 seeds per foot. Cover over the seeds with potting soil and
gently pack it down with your finger tips. Keep the soil moist at all times.
How to put on Gutter End Caps
Instructions
1 Hold your
end cap in place and use your power drill to drill a sheet metal screw into the
gutter to hold it temporarily. Use a 1/8-inch screw so a pop rivet will later
fit into the hole.2 Drill a 1/8-inch diameter hole into the end
cap on the opposite outer wall from where you installed the sheet metal screw.
Use the pop rivet tool to drive a rivet into the hole.
3 Unscrew the sheet metal screw and insert
another pop rivet into the hole. Seal the inside seam with your caulking. After
giving the caulking a day to dry, run a water hose through it to ensure your
end caps are sealed tightly.
Read more:
How to Close the Ends of a Rain Gutter | eHow.com
I found the information on lettuce on Pinterest. I know I often waste a plant by not realizing that I don't need to pull the whole thing up letting it just stay there growing more leaves or whatever.
Cut-and-Come-Again Lettuce
When I had a market garden, I grew 200-foot rows of lettuce. The
rows contained my own mixture of lettuce varieties, chosen for taste, color,
and leaf shape, and I cut the leaves young for the mesclun mix I sold to local
chefs. Twice a week my two young assistants and I knelt in the white clover
pathways to shear the baby plants.
Most of the dozen or so lettuce varieties were the type described as cutting lettuces, which obligingly and vigorously sprout a fresh crop of leaves when they are snipped off just a couple of inches above the ground. They are often called cut-and-come-again lettuces.
Cutting lettuces are mostly non-heading leaf varieties from two groups, Grand Rapids and oakleaf. The Grand Rapids group produces broad, crinkled, and frilly leaves, while the oakleaf varieties have flatter and distinctively lobed leaves. Both groups include red and green varieties and several red-green combinations. All make great garden design elements.
Paint the garden with lettuce
Whatever else I grow, I always have plenty of ‘Black Seeded Simpson’, an heirloom. I don’t bother with little packets; I buy it by the ounce, about 25,000 seeds. Properly stored, lettuce seed stays viable for three years. ‘Black Seeded Simpson’ is so reliable I use it as the standard for judging the germination success of other varieties. A fast grower, it produces crinkly, juicy, yellowish-green leaves. Its only shortcoming is a tendency to bolt in summer heat; it does best in spring and fall here on Long Island.
One of the best summer performers I have found is a romaine: a French cos, ‘Craquerelle du Midi’. When every other lettuce in my garden is getting bitter or defiantly announcing its plans to set seed, this one stays mild and leafy.
 |
|
 |
|
'Black Seeded Simpson'
|
|
'Oakleaf'
|
The red or green lobed leaves of the oakleaf types are pillars of the looseleaf establishment. There are at least half-a-dozen varieties of each color commonly found in seed catalogs. ‘Oakleaf’ is the original old standby that yields crisp, tender, light green leaves and keeps going through moderate heat. Although it has deeply lobed leaves, ‘Salad Bowl’ is not a true oakleaf. But it is an All-America Selections winner that produces rosettes of delicate lime-green leaves and also has good heat tolerance.
Tops for reliability, even through a hot summer, is ‘Red Sails’. Another All-America Selections winner, it’s a fast grower with green and reddish-bronze leaves.
 |
|
 |
|
'Salad Bowl'
|
|
'Red Sails'
|
A 1998 introduction that did well for me was ‘Green Vision’, which produces dark-green, glossy, savoyed leaves; it is a slow bolter. ‘Lollo Rossa’ has light-green leaves with elegant rosy margins, while its cousin, ‘Lollo Biondo’, is pure pale-green. Both ‘Lollo’ cultivars are deeply curled and heat tolerant, and very decorative both in the garden and in salads.
 |
|
 |
|
'Lollo Rossa'
|
|
'Lollo Biondo'
|
Stepping beyond the looseleaf varieties, there are some butterheads and romaines I like to grow as cutting lettuces. They will also sprout new leaves, if less energetically than the looseleaf varieties.
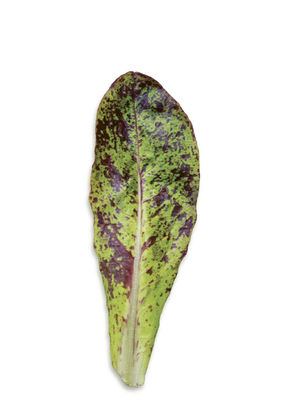
Of the butterheads, ‘Ermosa’ has dark green leaves and stands up to a fair amount of summer heat. In a weak pre-spring moment I ordered seed for a romaine called ‘Freckles’ or ‘Trout Back’, simply because I liked its name. I wish all my weak moments worked out this well. It is a beautiful lettuce, lime-green flecked with wine-red markings, and has a fresh, delicate taste.
 |
|
 |
|
'Ermosa'
|
|
'Freckles'
|
How to Make Stone Planters
The Martha
Stewart Show, November 2009
Make your
own stunning planter using stones and cement.

Tools and Materials
Plastic bin,
a bit larger than desired size of finished planter
Sand
Water
Large, flat
rocks
Cement All
Rapid Set cement
Black
acrylic paint
Latex gloves
Dust mask
Nonstick
cooking spray
Two 1/2-inch
dowels
Soil, moss,
and plants for finished planter
Planter How-To
1. Fill
plastic bin about halfway with sand.
2. Wet sand
until it is possible to make a ball of sand with your hands. Dig a hole in the
sand in the shape of the planter.
3. Place
rocks around sides of hole. Level the sand in the bottom of the hole, adding
more water to smooth sand, if necessary.
4. Mix 4
parts cement to 1 part water, adding a small amount of black acrylic paint to
tint the water before mixing.
Tip: Wear
latex gloves and a dust mask during this step.
5. Pour
mixed cement in base. Push cement in between overlapping rocks, and drag cement
up the sides of stones inside the planter with your fingers and hands.


2 comments:
Thanks for these instructions - it looks great. I'd like to try it too. :)
Am Richard, I am here to testify about a great herbalist man who cured my wife of breast cancer. His name is Dr Imoloa. My wife went through this pain for 3 years, i almost spent all i had, until i saw some testimonies online on how Dr. Imoloa cure them from their diseases, immediately i contacted him through. then he told me the necessary things to do before he will send the herbal medicine. Wish he did through DHL courier service, And he instructed us on how to apply or drink the medicine for good two weeks. and to greatest surprise before the upper third week my wife was relief from all the pains, Believe me, that was how my wife was cured from breast cancer by this great man. He also have powerful herbal medicine to cure diseases like: Alzheimer's disease, parkinson's disease, vaginal cancer, epilepsy Anxiety Disorders, Autoimmune Disease, Back Pain, Back Sprain, Bipolar Disorder, Brain Tumor, Malignant, Bruxism, Bulimia, Cervical Disc Disease, Cardiovascular Disease, Neoplasms , chronic respiratory disease, mental and behavioral disorder, Cystic Fibrosis, Hypertension, Diabetes, Asthma, Autoimmune inflammatory media arthritis ed. chronic kidney disease, inflammatory joint disease, impotence, alcohol spectrum feta, dysthymic disorder, eczema, tuberculosis, chronic fatigue syndrome, constipation, inflammatory bowel disease, lupus disease, mouth ulcer, mouth cancer, body pain, fever, hepatitis ABC, syphilis, diarrhea, HIV / AIDS, Huntington's disease, back acne, chronic kidney failure, addison's disease, chronic pain, Crohn's pain, cystic fibrosis, fibromyalgia, inflammatory Bowel disease, fungal nail disease, Lyme disease, Celia disease, Lymphoma, Major depression, Malignant melanoma, Mania, Melorheostosis, Meniere's disease, Mucopolysaccharidosis, Multiple sclerosis, Muscular dystrophy, Rheumatoid arthritis. You can reach him Email Via drimolaherbalmademedicine@gmail.com / whatsapp +2347081986098 Website/ www.drimolaherbalmademedicine.wordpress.com
Post a Comment