Monday, April 01, 2013

Time for Garening Much More

Cannot wait for the hydrangeas to be in full bloom!  Note the bench to the right that I write about in this blog.


I have spent the last few days trying to rid myself of dental pain from having some seriously long and tedious work done that resulted in my jaw screaming out in protest.  I didn’t eat, I didn’t talk and I took way too many pain meds before it gave up retreating to a distant memory.  

Now, let’s get busy!  Life is back to a quiet roar instead of my usual outrageous gun-hoe attitude.

I found some new pins on Pinterest that are calling my name.  First up in Mole control.  I hate using any poisons because of my pets.  I hope this will slow those buggers down.  I am making this solution today!  It won’t hurt my jaw and it will let me know that I haven’t forgotten my garden.

DIY: Mole Repellent:

1/4 cup castor oil
6 tablespoons water
2 tablespoons liquid detergent (use Dawn)

Combine all ingredients in blender until consistency of whipped cream.

To Use: Add 2 Tablespoons of repellent to a regular garden watering can and then fill with warm water.

Thoroughly water over areas of greatest damage. For best results apply after a rain or a thorough watering.

Trench Composting


I have a huge pile of compost from the old round compost barrel that no longer turns, but I still dump all the kitchen compost in it.  Jim hauled it over to the garden for me.  I am going to dig a trench once I know my jaw won’t protest.  Unlike the pain of child bearing 45 years ago, I do remember that pain from just a day ago.  I cannot go back there ever!

  • Dig trench near vegetable to be planted area
  • Layer of torn up cardboard
  • Layer of brown  like straw
  • Layer of paper or cardboard
  • Layer of compost from kitchen & garden
  • Layer of straw


I make mom balm and lotion using marijuana oil.  Mom is a legal medical marijuana user here in Oregon.  She doesn’t like my balm so much as it isn’t soft.  You and I wouldn't have a problem, but age almost 93, she wants it to be easier to get out of the jar.  This lotion’s picture looks just like I want so I will switch out the marijuana oil with the calendula oil to see what I come up with.  This is actually “quite” work that won’t task that problem jaw of mine.

Calendula Lotion ~ The Recipe

Ingredients

-4 ounces Calendula-infused oil
-2-4 ounces Calendula-infused distilled water
-0.5 ounces beeswax
-0.5 ounces vegetable glycerin
-o.5 ounces witch hazel
-1/4 teaspoon grapefruit seed extract, optional 
-15 drops essential oils of lavender, optional

Method
1. Sterilize all of your equipment and jars by putting it all in a big pot of boiling water then draining. It’s not vital that you do this, but it will help ward off bacterial growth…possibly extending the life of your lotion.

2. Prepare Calendula-infused distilled water by pouring boiling distilled water over fresh or dried Calendula flowers and steeping until it’s room temperature. Strain. Reserve 4 ounces of the “tea.” Note: You may simply use plain distilled water, I just like to add an additional Calendula punch. And yes, distilled or pure water should be used to prevent bacteria from growing.

3. Measure out the oils and beeswax by weighing them on a kitchen scale. Add them to a wide-mouth pint sized glass mason jar. Using a makeshift double boiler method, place a washcloth on the bottom of a pot filled with water, then place the jar in the pot. Melt oils and beeswax over low heat, stirring occasionally.

4. Remove the jar of melted oils and beeswax from the pot and allow them to cool on the counter. Note: This is the most important step! I can’t stress enough the importance of the oils, beeswax, water, vegetable glycerin and witch hazel all becoming room temperature prior to mixing. This must happen in order for the lotion to bind.    

5. Throughout the cooling process, blend the oil mixture with a stick blender in order to produce a smooth texture. Once room temperature, begin slowing adding vegetable glycerin, witch hazel, and herbal infused water (and essential oils if using) in a slow steady stream while blending. Note: Add infused water, between 2-4 ounces, until you have reached desired thickness. As the lotion cools further, it will thicken.

6. Pour into storage containers. This recipe will produce approximately 6-8 ounces of high-quality lotion. I’ve kept it on my bathroom counter for 4 months without ever having an issue. For longer storage, keep in the refrigerator.
Get ready to bathe your family in Calendula goodness! 

Making Magic out of Plain Concrete Steps

I have concrete steps out back that are boring.  Jim did an excellent job making them, but they are now simply nice steps.  I need to jazz up the look.  I took possible ideas off of Pinterest showing possibilities.  I probably will go for the hydrangeas since I am continually starting hydrangeas from the cuttings I do every winter.  I give away oodles of these lovely plants.  I might as well make some good use of them myself.  

I need to consider that I plan to create a path to my “almost” chicken coop that Jim has planned; yet not yet built.  The path could lead by the burn barrel that we use in the wet months here in the Pacific Northwest.   

I could do a whole trail of hydrangeas all the way to the coop!  That would be more than beautiful.  How about if I made a large rebar /fencing trellis 
On the left of picture the rebar-fence trellis
 covered with Clematis
for one of the wisterias that I also started from a cutting or maybe one of the climbing hydrangeas that I also started?  I have one  of those inexpensive trellises out front holding up a massive evergreen clematis.   Ah, the possibilities turning in my brain.

Lithodora from Monrovia
I like the this picture design and might inter plant the hydrangeas with some other plants so I am not ending up with too much of a straight line of sight with every plant being the same height.  I already have a few Rhodies planted there that I saved when we put in our vegetable garden in a former border of flowering shrubs.  I still find Lithodora and daffadils coming up in the new vegetable garden.

I am so painting the bench out front that is in front of three blue hydrangeas!  It is natural wood that is going South fast.  It needs help with a fresh yellow paint!

Remember putting up gutters in the greenhouse that I blogged about the other day?  Well, here is an idea of maybe how I can support those gutters.  I actually already have a planter box on one side of my greenhouse to use wooden support for the gutters.  I could even build these, but I believe gutters will be cheaper and thus favorable for the likes of me.

This vegetable cover looks easy enough for me to even manage to build it.  I love the idea, but since I don't have beds in the vegetable garden I would just free stand it where needed.

I also saw these cages that are fascinating for those of us here in the PNW where those warmth loving plants can be a real struggle to succeed with. 

 We have a huge hoop house where we put mom's marijuana plants along with tomatoes, so we have endless amounts of extra or old plastic to make these little greenhouse-type houses for individual peppers or maybe eggplants.  I'd love some eggplants.

My sweet little pumpkings would love this support!  I have a grove of willow growing out back just for the purpose of building projects like this.  Warning:  I made a gate out of fallen aspen and my gate is growing.  I imagine the willow may grow too.

Now there is enough juice in my mind to keep me going all day today.  I hope you find this interesting too feeding your need to get your fingernails dirty.

I LOVE Pinterest!  I found this pin today for more thought of all things Pinterest.  I still need to
check it out.  Maybe we can do that together.

Monday, March 25, 2013

Time to Think Tomatoes


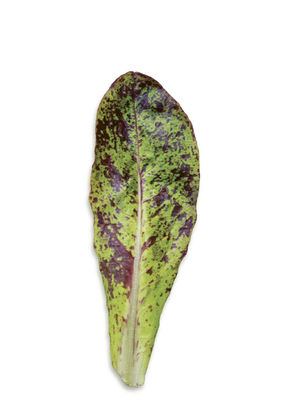
I purchased several tomato seeds this year.  My favorite from last year was given to me by a friend, which was given to him by one of his friends.  Needless to say, we don't know what it was!  Ah, to keep them labeled so I will know which ones to order for next year.

It is time to think tomato re-potting as my seedlings are about ready.  I chose some of the pins I saved on Pinterest about what to do early on for my tomatoes.  More post later as I get things going with all things tomato.


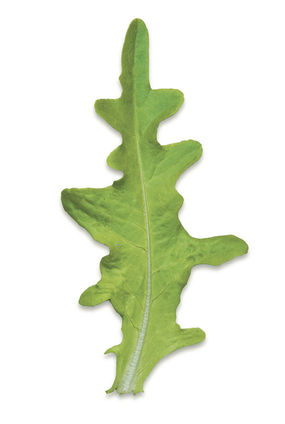
First Leaves and True Leaves on Tomato Seedlings


Seeds are essentially embryos. Cotyledons form the embryonic leaves. Botanists classify plants based on the number of cotyledons or leaves. I think.  Sorry, I am not a botanist. What I can tell you for tomato seedlings is that the First Leaves to emerge are not True Leaves. They break the surface and are part of germination geared towards establishing the tomato. They are simply called first leaves.  In this case a picture is worth a thousand words.

First Leaves but Not True Tomato Leaves - The Rusted Garden Blog

These first leaves to emerge do not have a basic tomato leaf shape. The edges are not scalloped or broken in  any way. True leaves for a tomato seedling are the second set of leaves to develop. They typically show up 10 days after germination or 14-21 days from planting the seeds. True Leaves for a tomato typically have the tomato leaf shape we are accustomed to seeing.  Here is another picture to show you the actual true leaves of tomato seedlings. Notice the difference in shape.

True Leaves of a Tomato Seedling - The Rusted Garden Blog

True leaves let you know it is time to start considering transplanting the seedlings into larger containers. When you decide to transplant and how you transplant them is a personal choice of technique. Typically, tomatoes are transplanted 3-5 weeks from the original seed planting date.
http://therustedgarden.blogspot.com/2013/03/60-seconds-or-sow-what-are-first-leaves.html

Without this information, I might transplant before they are ready.  Horrors!  I probably have been doing this wrong for years!


I will be setting the plants outside in the hoop house about May or maybe sooner since they will be warmer in the hoop house.  Time to think fertilizers.  I found these on Pinterest.


  • Jerry Baker's Recipe for Tomato food: 3 C compost/mulch/dirt 1/2 C Epsom salt 1 T baking soda 1/2 C powdered milk 1. Mix all the ingredients together in a bucket. 2. Place a handful of the mixture into the hole you are digging for your tomato plant. If you have already planted you can sprinkle a handful of the mixture around the stem of the plant and then water.

  • Epsom salt as fertilizer, pest deterrent, and seed starter. For tomatoes: Drop 1 cup epsom salt and 1 cup of granulated sugar along with a few eggshells into the hole. Also, plant Marigolds with edibles to keep pests away.
Now to go to the extreme of trying to make my tomatoes end up with perfection!

How We Plant a Tomato


It's been a tradition for us to repost these instructions each year at this time.  Happy tomato growing!

How do we at Love Apple Farms plant a tomato, you might ask?  With a ridiculous amount of stuff in the hole, is the answer.  When someone ropes me into telling them and I start the long answer, I eventually see their eyes glaze over.  That's the point where I say, "Then you throw in the kitchen sink and cover it all up."  To date, no one has laughed at that joke. I think they're just either too overwhelmed by the real stuff I put in there, or they actually believe I'm throwing in a sink.  This is how I plant a tomato.  First off, let's take a look at our sexy specimen here on the left.


This strapping beauty is the size of seedling I like to plant.  It's about 12 to 16 inches tall, and was potted up into a gallon container about 3 or 4 weeks ago.  It will go into one of our freshly prepared beds, shown to the right.  We amend our beds by digging into them with a spade fork two bags of Gardner & Bloome Harvest Supreme and two bags of their Farmyard Blend.  It has lots of organic goodies in there like composted chicken manure, bat guano, kelp meal, Humic Acid and mycorrhizal fungi. We also add four quarts of G&B All-Purpose Fertilizer, the 4-6-4 formulation. We turn the soil over, thoroughly blending these über ingredients in with the native soil.  Get as deep as you can into the soil with the spade fork, making it nice and light and fluffy.  

The tomatoes are placed three feet apart. I've learned over the years that spacing them closer than that means less fruit.  We dig a nice deep hole to accommodate all the additions - the exact depth is dependent upon how tall the seedling is.  I want the plant to be almost completely submerged into the soil, and the fish head and amendments put into the hole need to be covered with a bit of soil, so I plan accordingly for the depth.  This particular hole ends up being almost two feet deep, and is ready for our first goody, these impressive fish heads.  I am lucky to have a fisherman living with me.  I will not want for any fish heads.  The job will be to keep the dogs and cats from wanting to dig them up.  


We get them from the restaurant we grow for, Manresa.  You might be able to get them free from a good butcher or fishmonger.  I even know of someone who called a few restaurants in their area and was quickly rewarded with a nice bounty of juicy fish heads.  Fish tails, spines, guts, as well as shrimp shells are all good as well.  Some of you may worry about critters digging these up later.  I've never had a problem with animals digging up my tomatoes, and I've got three dogs, five cats, and what seem like an endless supply of raccoons, bobcats and coyotes living on the property.  I stress the point that this is the first thing that goes into my very deep planting hole.  That may help keep it from getting dug up.  You can see the six inch long fish head staring up at us from the bottom of the hole here:


If you can't find fish heads, Fish Bone Meal is a good substitute.  Gardner & Bloome makes a nice one.  You can find G&B products at good nurseries in the Western state. Chuck a handful of it into the bottom of the hole.  Fish Bone Meal may be the way to go if you're growing in a pot or can't dig a hole two feet deep.  Fish emulsion is not a good substitute, as it will quickly dissipate and not feed the tomato over a long time period.


The next thing that goes into the hole are a couple of aspirin tablets and some crushed chicken egg shells. The aspirin is to help jump start the plant's immune system.   I'll put three or four crushed egg shells into the hole as well. You can see our three colors of eggs from our fancy chickens - yes, those are green eggs in there. The eggs supply a nice calcium boost, which will help prevent blossom end rot, that nasty brown patch on the bottom of tomatoes that lack calcium (the fish head bones and bone meal also help with that).

Bone Meal is the next to go into the hole, particularly if I've put a fish head in and not Fish Bone Meal.  I put in a heaping handful of Bone Meal.  This is a nice organic phosphorus source, which is essential for blossom production.  More blossoms, more fruit.  Bone meal also increases calcium availability for the tomato.

I then put in two handfuls of Gardner & Bloome Tomato, Vegetable and Herb organic fertilizer.    You can use any type of dry organic, all-purpose fertilizer.  The key is that it's got all three macro-nutrients (something close to 4-6-3 designation). It's not difficult for us in the Western states to find Gardner & Bloome products at your good local nursery. If you need help, here is a store locator for you.

I also recommend putting at least a large tablespoon of pure worm castings in the bottom of the hole.  We amend our beds with worm castings and also spray a worm casting tea on the plants while they grow.  Really great stuff.  If you need to purchase some, be sure they are 100% pure.  There are lots of cheap compost with small quantities of worm castings thrown in.  Check the bag for the ingredients to ensure you're getting high quality.  If you'd like to buy some of our 100% pure organic worm castings, click here.

The hole is complete (sans kitchen sink) and I'm now ready to pop in the tomato plant.  I trim off the lower leaves, be there one,two, three or more, leaving only the top-most leaves.

I put an inch or two of soil on top of the amendments in the hole.  The plant is eased out of the pot, and before it's placed in the hole, I sprinkle the rootball with a product called RootZone, which is a mycorrhizal fungi that attaches to the roots, growing as the root ball grows.  It helps protect the plant from some diseases, such as verticillium and fusarium wilts.  The product is sold under other names, such as Power Organics Mycorrhizal Root Booster.

Once the tomato is in the hole, I double check the depth by judging how far out of the ground the plant will be sticking.
   
If it's going to be too far down, I'll add some more soil.  If it looks like it'll be up above the soil more than I want, that's too bad because I ain't gonna be fishing them fish parts and all that other stuff up out of that hole and digging it deeper.  No siree.  So I try my  best to gauge the depth of the hole according to the height of the plant I'm putting in.

We then back fill GENTLY - only one quasi-firm push settles the soil around the plant.
  
Please do not man handle the soil around the plant by stomping on it or pressing too hard.  That's not necessary and it expels all the air out of the soil.  Believe it or not, the roots need oxygen down there just as much as they need nutrients and water.


Now, we have that beautiful row of potential sweetness and all sorts of possibilities!


Sunday, March 24, 2013

Chickens for Karen


My dear husband, Jim, has agreed to build me a chicken coop for my birthday; which is coming up very soon on April 12.  Meanwhile, I have been gathering information about chickens so I can start off running instead of making some stupid mistakes with my first flock of sweet little chickens.

This blog will be lots of chicken information amassed over several weeks.  I have also ordered the pictured book for reference:


An inspiringly clean chicken coop 
Here at Sunset, we solve the problem of the nightly droppings cascade by having a henhouse with an open-mesh bottom. The whole structure sits on stilts (high enough to prevent a hungry racoon from shooting an arm up through the mesh and grabbing a chicken leg), and the droppings fall through to a straw bed underneath…which we periodically rake out into our compost bin. It’s a little less work than emptying a hammock and seems to suit us and our chickens.

Michelle Tullis, the clean-coop owner, also elevates her feeder and waterer so that dust, dirt, and feathers don’t get mixed in. Admirable.

Our solution is to simply hang the feeder and the waterer from the top of the coop’s roof. It works, sorta. We still get a fair amount of dirt in the water, and twigs and such in the food. So I love the way Michelle has positioned rocks and pebbles around both—no way any chicken can kick up dirt from stone!—and we might do the same. She’s clearly spent some quality time watching her birds and analyzing their behavior.

Anything a chicken-owner can do to keep a coop clean is a good thing. It keeps both hens and humans healthy. And helps deter R-A-T-S.
My husband came away from reading an article on a chicken desease called, histoplasmosis.  I swear I thought he was going to nix my chicken dream until today.  He read on the internet that this desease is not a problem here in Oregon.  Ah, the dream continues.

I am sorry that I have lost the link to where I found some of this information.  It might be emails that my husband sent from his office as he researches his own chicken information.

Some of the following was forwarded to me by my husband from his searches on the internet.  You can see where his interest lies.  He is all things about reasons not to have chickens like what could possible be harmful or just wrong with allowing chickens into your life.  Needless to say, it is still valuable information even if I didn't go out to find it. 

Backyard poultry

Backyard poultry have become increasingly popular in recent years as interest in locally produced food, including eggs, has grown. Many local municipalities allow a limited number of domestic fowl on residential properties. Before getting a backyard flock, it is important to understand issues related to legal aspects, husbandry and health, and diseases that can be spread by poultry to people. Fortunately, there are many great resources available locally and online for owners of backyard poultry.

Backyard poultry husbandry

Educate yourself about poultry husbandry before getting your flock. For chickens, you will need a coop and enclosure with proper feeding and watering systems where your flock will be comfortable and safe from predators. The presence of chickens on a property might attract domestic dogs and cats as well as wild predators such as raccoons, coyotes, foxes, bobcats and cougars. In addition to the danger predators present to the chickens, their presence increases the chance of conflicts between predators and humans. It is important to have sufficient structural protection to prevent predator access to your chicken flock.

If you decide to compost manure and used beddings then it is important to learn how to do so safely to avoid contaminating your garden with dangerous pathogens (organisms that can cause disease). Proper composting creates heat, which will help destroy potentially harmful bacteria. Control of rodents around chicken coops is extremely important as mice and rats are attracted to the feed, will contaminate the area with their droppings, may eat the eggs, and can damage structures. Rats will kill and eat baby chicks. Furthermore, rodents carry diseases that can spread to people such as leptospirosis and hantavirus infection.


Keeping your flock healthy


You can greatly decrease the risk of disease entering your flock and persisting in soil, droppings and debris by following 
6 basic backyard biosecurity tips recommended by the U.S. Department of Agriculture (USDA).

1.     Keep your distance -- Restrict access to your birds and allow only people who take care of your birds to come into contact with them.
2.     Keep it clean -- Use a designated pair of shoes or shoe covers, and a designated set of clothes or clean and disinfect your shoes and clean your clothes before entering the coop.
3.     Don't haul disease home -- New birds should be separated from your flock for 30 days. Birds that have been to fairs or exhibits should be separated from the rest of your flock for two weeks. Clean and disinfect poultry cases and other equipment that have been to another location where birds are present.
4.     Don't borrow diseases from your neighbor -- Don't share birds, lawn and garden equipment with other bird owners.
5.     Know the warning signs of infectious bird diseases -- Early detection of signs is very important to prevent spread of disease. They may include sneezing, coughing, nasal discharge, diarrhea, lack of energy, poor appetite, drop in egg production, or sudden death of multiple birds.
6.     Report dead and sick birds -- Immediately report dead or sick birds to the WA State Department of Agriculture's (WSDA) Avian Health Hotline at Program at 1-800-606-3056 or the USDA Veterinary Services Office at 1-866-536-7593 or your local veterinarian.

Individual dead birds weighing less than 15 pounds can be disposed of in the household garbage. Place the bird in two sealed plastic bags. A bird weighing less than 15 pounds may also be buried on the owners' property. But disposal in the garbage is usually a better option to avoid predators digging up the carcass. When a disease outbreak is suspected or you don't know the cause of death, you can report dead birds to the WSDA or USDA by calling the toll-free phone numbers listed above. They can also provide consultation on how to dispose of several dead birds.

Disease risks to people from poultry

Baby chicks and ducklings commonly shed bacteria such as Salmonella that can cause human illness. Young birds are often shipped several times before they reach a permanent home. Shipment and adapting to new locations causes stress on birds and makes them more likely to shed bacteria in their droppings. Salmonella bacteria can be shed in large numbers in the droppings. They can be on the shell or inside the egg.

Birds infected with Salmonella do not usually appear sick. Salmonella infection is spread via the fecal-oral route. People can get infected by ingesting Salmonella bacteria if they don't wash their hands after contact with poultry or their contaminated environment or by eating food or drinking water or milk that has been contaminated with Salmonella bacteria. Person infected with Salmonella can spread it to others if they don't wash their hands after using the bathroom.
Infection with Salmonella can cause diarrhea, stomach cramps, fever, vomiting, and dehydration. The risk of infection and more serious illness is higher for children under 5 years of age, pregnant women, the elderly, and persons with weakened immune systems.

There have been several outbreaks of Salmonella infection in people resulting from contact with baby poultry, including a multi-state outbreak in 2011in which almost half of the cases were 5 years of age or younger. In 2006 three different Salmonella outbreaksassociated with baby poultry were reported.

Campylobacter is another bacterium that is common in poultry and can cause human disease. Infected poultry can shed Campylobacter in their droppings. It can cause diarrhea, cramps and vomiting in people. Raw or undercooked chicken is one of the most common sources of human infection.
Avian influenza (or bird flu) occurs naturally among birds. Backyard poultry can get infected by contact with other birds, including wild birds. Currently, public health officials are concerned about an avian influenza virus (known as H5N1) that has been sickening poultry and some wild birds in other parts of the world including parts of Europe, Asia and Africa. H5N1 virus does not usually infect people, but a small number of cases have resulted from people having direct or close contact with H5N1-infected poultry or H5N1-contaminated surfaces.
To avoid getting infections from poultry, it is important to follow these guidelines:

1.     Always wash hands thoroughly after touching chickens or ducks or anything in the area where they live. Use hand sanitizer if soap and water are not available. Adults should supervise hand washing for young children.
2.     Do not clean cages, feed or water containers, or other poultry related equipment inside your house or in areas where food is prepared.
3.     Do not let live poultry inside your house, in bathrooms, or especially in areas where food or drink is prepared, served, or stored, such as kitchens, or outdoor patios.
4.     Do not snuggle or kiss baby poultry, touch your mouth or eat or drink or smoke around baby poultry.
5.     Do not give baby poultry to young children. Children younger than 5 years of age should not touch baby poultry.
6.     Keep eggs and left-over egg-containing foods refrigerated at 45ºF or less at all times. Discard cracked or dirty eggs.
7.     Do not eat raw or undercooked eggs, including restaurant dishes. Cook eggs until the white and the yolk are firm (145ºF) and eat promptly.
8.     Thoroughly wash hands and all food contact surfaces with soap and water after contact with raw eggs. Then disinfect food contact surfaces as follows:
    • Apply a mix of 1 teaspoon liquid household bleach per gallon of cold water.
    • Do not rinse.
    • Let air dry.
    • Prepare the bleach solution fresh daily.
 Safe handling of eggs from your backyard flock
    Eggs can contain harmful bacteria including Salmonella. Salmonella bacteria can be on the shell or inside the egg. Always wash your hands with soap and water immediately after collecting eggs or working in the chicken coop. For your protection follow these instructions for collecting and cleaning eggs:

    Maintain clean and dry nest boxes, change nest material as needed to reduce dirty eggs. Gather eggs at least once daily.
    Clean eggs soon after collection, but only if soiled. Minimal cleaning preserves the natural protective coating.

    Acceptable egg cleaning methods include:

  • Spot clean or lightly sand the stains or small dirty spots with sand paper.
  • Quickly rinse with warm running water using a spray bottle, then immediately wipe dry with a single disposable paper towel.
  • Do not soak eggs or use detergents or cleaners not approved for egg cleaning.
  • Eggs are a perishable food, so cleaned eggs must be held under sanitary conditions and refrigerated at 45ºF or less at all times.
  • Thoroughly wash hands before and during egg handling to minimize cross-contamination of finished eggs.
Food safety tips


The U.S. Centers for Disease Control and Prevention (CDC) estimates that each year roughly 1 in 6 Americans (or 48 million people) gets sick, 128,000 are hospitalized, and 3,000 die of foodborne diseases.Salmonella is the single most important foodborne disease now. In addition to contact with live poultry, people can get infected with Salmonella bacteria by eating raw or undercooked poultry products or other food that includes raw eggs (e.g. cookie dough) or has been contaminated with Salmonella bacteria. The tips below can also help prevent other foodborne diseases such as infections with Campylobacter and E. coli.

  • Keep eggs and left-over egg-containing foods refrigerated at 45ºF or less at all times. Discard cracked or dirty eggs.
  • Do not drink unpasteurized milk or eat products made with unpasteurized milk (e.g. cheeses).
  • Do not eat raw or undercooked eggs or raw or undercooked meat, including restaurant dishes.
  • Do not cut vegetables or other ready-to-eat foods on the same cutting board as chicken or meat without thoroughly cleaning the knife and the cutting board first.
  • Cook eggs until the white and the yolk are firm and eat promptly.
  • Use a food thermometer to check that poultry and meat are hot enough to kill harmful bacteria:
  • Poultry: 165ºF
  • Ground meat (beef, pork and veal): 160ºF
  • Pork (except pork sausage): 145ºF
  • Steaks and other beef, veal, lamb, and fin fish: 145ºF
  • Thoroughly wash hands with soap and water before or after contact with raw eggs or meat.
  • Thoroughly wash all food contact surfaces with soap and water after contact with raw eggs or raw poultry or other meat. Then disinfect food contact surfaces as follows:
  • Apply a mix of 1 teaspoon liquid household bleach per gallon of cold water.
  • Do not rinse.
  • Let air dry.
  • Prepare the bleach solution fresh daily.

I have wanted chickens for years so I would have a limitless supply of chicken poop for my gardens. 

The Scoop On Poop
 Let’s talk poop!  Chicken poop, of course.  Is it the somewhat unspoken topic many chicken owners just tolerate, or is it a subject with a lot of humorous potential?  In this article I will regale you with some of my own chicken poop experiences that I have known and loved.First of all, chicken poop can be poetic.  I even made up a rhyme about it:  Manure tea will burn a tree!  Isn’t that catchy?  I learned this the hard way, as I have learned a lot of my chicken poop lessons.

I had wheelbarrow full of chicken manure and dirty bedding that I was shoveling out of a coop.  I left the wheelbarrow out in the rain and it filled to the top with water.  I thought, well, this is great!  Now I have liquid fertilizer!
So I wheeled it over to a young curly willow tree and dumped half the water off onto the roots.  A few days later, the top half of the tree looked like someone had taken a blow torch to it.  My bad!

I hoped for a month that the whole tree wouldn’t die, and luckily it didn’t.  Just the top half.  I pruned off the burnt parts and now the tree is thriving again, but that was a close call.   Wheelbarrow manure water (patent pending?) is hot stuff!

What is meant by “hot?”  Some people say “hot” manure is really a sub-category of “green” manures.  Which is a manure that is too high in nitrogen content to be used on plants.  Why too much nitrogen all at once is bad for a plant I am not exactly sure.
Maybe a chemist can help me with that question.  Other sources say that it’s not how much nitrogen is in the manure but rather that the nitrogen is very readily-absorbable by plants, and they take up too much and it “burns” them.  Again, why it actually causes plant cell destruction is something I wish I knew.

Chicken Protection

I found a way that some people use to keep skunks and other animals from entering the coop to steal my eggs and maybe even kill the poor defenseless chickens on this forum: http://www.backyardchickens.com/t/703322/predator-proof-chicken-run

I'm thinking that I could pile rocks on this area that would also make it difficult to dig into.  I have an endless supply of rock that I dig up every time I plant anything. 


I loved this idea of a chicken moat, but it will need to wait.  It would take me a long time to make it happen around my vegetable garden.  I might make a run around the garden without a house and just transfer the chickens to run around in the "moat" for a day at a time. 


A moat is simply a strip of dry land, enclosed by two parallel fences, which surrounds a family's garden. Throughout the day, the hen patrol moves all around the garden (but never in it), munching on all those things hens love: weeds, seeds, worms, tiny pieces of stones and (best of all) bugs.

It be great if chickens also ate gophers!!
http://www.motherearthnews.com/sustainable-farming/garden-pest-control-zmaz88mjzgoe.aspx#axzz2OTVOyPnR 

http://egglayingchickens.com/best-laying-hens.html


The best laying hens for egg production:  

Leghorns: These hens lay very well, with an average of 300 (white) eggs per year. However, they do not sit on their eggs and will not go broody. Most modern laying breeds have some Leghorn in them.

Rhode Island Red: One of the top breeds for egg production, they lay high quality brown eggs. There is also a Rhode Island White that lays brown eggs (we have six RIW hens).

Sex Links: Chickens bred for egg production, sexed at birth by color. Commercial breeds have been dubbed Black Star and Red Star, and are very good layers of brown eggs. However, they are hybrids and thus do not maintain the color characteristics through subsequent generations.

The best laying hens for egg hatching:

Cuckoo Maran: Not the most prolific layer, but a very good setting hen that lays quality brown eggs.

Rhode Island Red: Popular for backyard flocks as the females are good layers and the males make good meat birds. They will set on their eggs. However, the sex-link versions and other hybrid Rhode Island Red strains will not go broody.

Light Sussex: A bird originally from the UK, also dual-purpose (meat and eggs).

Plymouth Rock: An American breed whose hens will go broody and whose males are good for eating as well.

If your best laying hens won't hatch their eggs, but lay a plentiful amount and have had a rooster around long enough that the eggs they lay are fertile, you can always hatch your own chicks using egg incubators. It's not terribly hard, and then you just need a brooder house or, for smaller operations, a good heat lamp and a box, to raise the baby chicks until they can survive in an outdoor pen.

Once you've had a flock for some time and have tried many different breeds of chickens, your own best laying hens might surprise you. Enjoy them!  

I have not decided just what chickens I will end up with.  I know I prefer green and brown eggs so that will be a factor in my decision.  My neighbors have such chickens so they will be help in making sure I get the ones I want.


I hear that those pretty Silkies are hard to deal with because of their fluff beyond reason giving them foot problems.  Beauty isn't always the best choice.  The above illustration shows a similar bird called a Sultane.


I have an orchard and plan to make sure my chickens will be able to feast of the apples that fall to the ground in the fall.  I won't be picking up apples any longer!  My chickens will benefit and I will save myself from one more job.  I'll gather eggs instead.

I always grow pumpkins for pies, but often have too many for my own use.  It was good to see this information on Pinterest.  Raw pumpkin seeds can be used as a natural wormer in chickens. http://homesteadrevival.blogspot.com/


Growing Your Own Forage Blend is Easy You don’t have to be a Master Gardener to grow your own Chicken Forage Blend. All it takes is a little know-how and a short list of supplies. My instructions will only show you how to grow one 17 inch flat of the seed blend, but if you understand the concept of successive gardening, you can schedule multiple sowings two weeks apart for a continuous supply throughout the growing season

Peaceful Valley sells the Chicken Forage Blend in one pound bags, perfect for making small batches. ;A 1-pound bag of Chicken Forage Blend sows about 20 of the 17 inch seed flats; or if your backyard allows for more space, you can buy the seed blend in bulk and plant an Omega-3 lawn for your chickens to graze on.


For those who can't free range their chickens, like me I also just read about a neat idea where there are basically 4 runs surrounding the coop so you can rotate your chicken through those areas giving the old ones time to rejuvenate. I like the idea of sowing something other than grass to peck at and trample.  We have two dogs along with a large male hunting cat.  I'd hate for a chicken to die because I didn't bother to protect them.  I found this on Pinterest.


If you want to see more of what I have found on Pinterest, Here is the link to my Chicken Information Board.  I also have a board on Pinterest for Chicken Coops along here is one for other coops on Pinterest.

See you soon with more about my life up the Winchuck River on my little plot of land with full sun and warm summers without the coastal fog.  Maybe I will blog about my efforts to grow marijuana for my mom's cookies....hmmm


Video Bar

Loading...

We Welcome You to Our Blog!


We blog about our rural area in the Pacific Northwest . This blog is all about my life and the places where my mind wonders from day to day. Have fun reading and looking at pictures. We welcome comments.

Be sure to watch, just above this blurb, my husband, Jim, using his 10 foot hands-free electric fishing kayak

Plurk

Snap Shots

Get Free Shots from Snap.com
Subscribe
Enter your email address to receive notifications when there are new posts
Powered by BLOG ALERT

BlogCatalog

Blog Hints

Electric Powered Hands-Free Fishing Kayak

Be sure to check out the separate blog to find out about our electric kayak, Kingfisher 10! You can find the blog at http://electrickayakkingfisher-10.blogspot.com . You can also read the features list on this kayak and purchase building plans and building kits at www.winchuckriverstore.com .

About Me

My Photo
We moved to our current home on the Wild River Coast of Southern Oregon from San Jose, CA. Our family consist of Jim and Karen, two dogs and two cats. Karen's passion is gardening. Jim's obsession is building electric powered fishing kayaks and fishing.